Friday 8 March 2013

Reception Questionnaire

As I mentioned in my previous post, I did various wedding printable searches when looking for the perfect bridesmaid invite. Sadly I wasn't able to find the right invites, but I did find inspiration for a guest questionnaire for our wedding. If you've never heard of this, don't worry, I hadn't either. Basically it is just a small card with some questions, intended for the guests at a wedding to fill out. I think it could be a fun way to get some quest feedback and provide some happy memories for John and I as years pass.

While most of the questionnaires I found on Pinterest were beautiful, I really wanted something simple. I eventually came across a style I liked and decided to create my own personalized template based off this style. I found all of the frames and different elements online, I even downloaded a free font to use. I felt this would be a pretty inexpensive project as I arranged an 8.5' by 11' piece of paper to include four questionnaires, meaning it would only cost me a few sheets of card-stock in the end.

Supplies:
  1. Adobe InDesign (trial)
  2. Quality card-stock
  3. Printer
Directions:
  1. I first created an Adobe InDesign on an 8.5' by 11' piece of paper that was evenly split four ways. This ended up taking more time than I had originally intended as I needed to ensure the useable area did not interfere with the printable area of the page.  
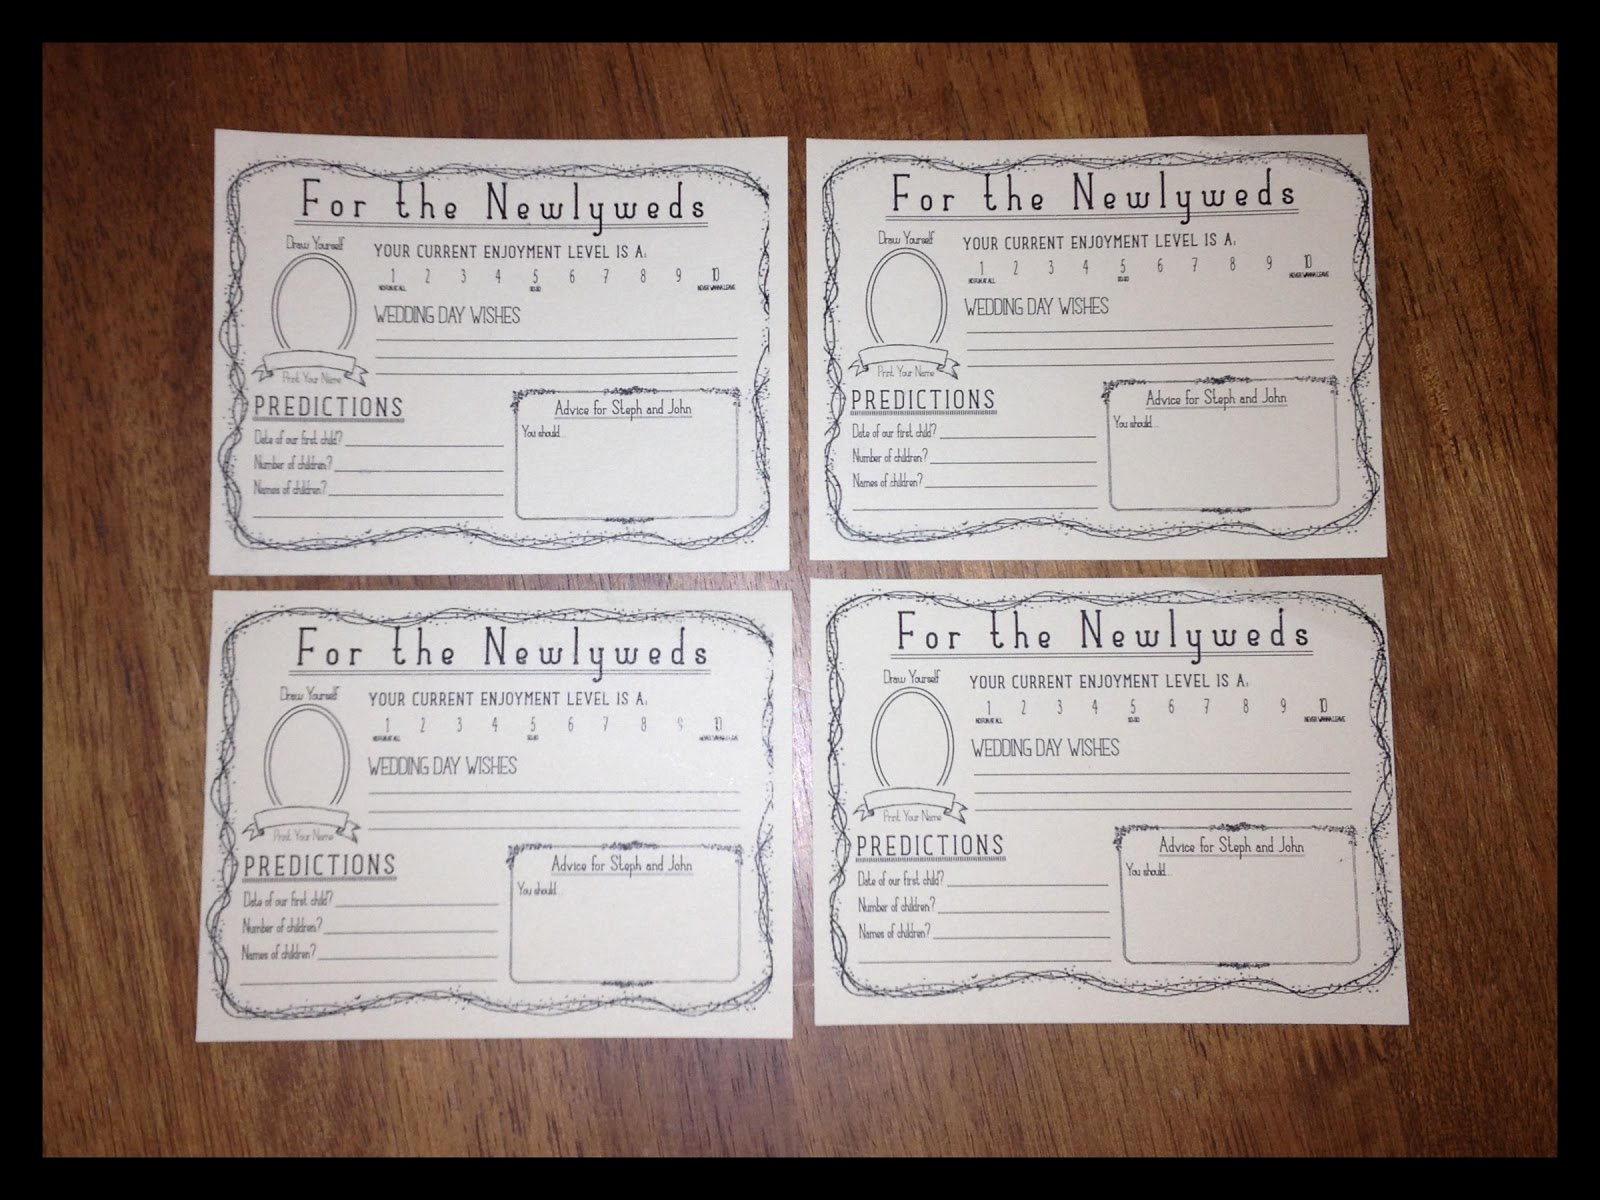
  2. I then included various frames and different elements within the frames. It took me some time to think of the questions I wanted to include for this questionnaire. I want our guests to feel included, but I didn't want to bore them with endless questions to fill out.
  3. Once all of the questions I wanted were included I printed the document onto coral and ivory coloured card-stock and cut the page into the four even sections so that each questionnaire was independent from the others. 
I made sure to not include any colour in our questionnaire as I liked how it looked, and since it cuts down on printing costs - bonus! I am really excited about this experiment for our wedding. I can't wait to see what answers we get for our questions, especially the one about potential future children. I'm am not sure if I want to incorporate these into the guest book somehow, but either way I know I will be using these at our reception.

Friday 1 March 2013

Bridesmaid Mania

One of the things I am most looking forward to on my wedding day, is getting pampered and dressed up with my best friends before walking down the isle. Before that can happen though, I need to ask these special ladies to stand by my side. As much as I would love to be able to ask each of my potential bridesmaids this favour in person, it is not possible as we all live in different cities. So I've opted for a mailed invitation instead.

At first I had the intention of finding a free online printable and customizing it to meet my own tastes, however all of the styles I found weren't quite what I was looking for. So instead I decided to utilize my education and attempt to create an invite of my own using Adobe InDesign (no, I did not purchase this program, I'm using the free 30-day trial). While creating the invite, I remembered a unique invite idea I had seen years ago and decided to implement it into my own invite. I intended to find a wedding related inflatable item and include it with the invite, so that if they agreed to be in my wedding they were to send me a picture with their new toy. So I paid a visit to my local Party City (a party supply store) in search in a wedding related inflatable. When I found these little crabs I was inspired (do crabs have anything to do with the wedding? No. Will this be funnier? Absolutely!), I created a paper invite and homemade confetti and stuffed them all into envelopes and mailed one to each of my girls.

Supplies:
  1. Various coloured card-stock
  2. A hole punch
  3. Inflatable Crab
  4. Envelope
  5. A good colour printer *not shown
  6. Adobe InDesign (trial) *not shown
  7. Photos *not shown
Directions:
  1. I started by creating a half-page invitation on Adobe InDesign for each of the ladies I intended to ask. This ended up taking more time than I had originally thought as I wasn't exactly sure how I wanted it to look. I began with a folding card, but ended up going for a one page, one sided invite as I felt it best communicated my message. 
  2. I chose to include a photo of myself with each of my bridesmaids in order to personal her invite and make her feel special. I also chose to include a background dress silhouette as I felt it added more of a wedding feel to the invite.
  3. I then printed these invites onto a durable cream coloured card-stock, using a high-quality coloured printer. This was important as I wanted these to look professional.
  4. I then took sheets of card-stock in the colours I intend to use for our wedding and made confetti using a hole punch. This ended up being more difficult than I had originally thought as I had to keep cutting the paper as my hole punch would only punch about an inch of paper before stopping.
  5. I then put the invitation and inflatable crab into an envelope, sprinkled some confetti into the envelope, scaled them up and sent them out. 

Here is a preview of what they will look like. I am really happy with how these turned out and I am really excited to eventually get the pictures back from my friends, I am sure I'm in for a laugh. As I want this to be a surprise, and I know a couple of my friends read this blog, I am keeping the finished product secret until after they receive them. Stay tuned for an update on how my bridesmaids liked their invites! 

Saturday 23 February 2013

Fabric Affair

Ever since getting engaged, I have found myself watching shows like "Say Yes to the Dress" and "Four Weddings" in hopes of getting inspiration for my big day. One of the things I have always loved were the flower accents brides and bridesmaids sometimes have in their hair. So I set to the Internet to find out about these pretty hair pieces, only to find they tend to run quite expensive in bridal salons. So I opened Pinterest and worked my magic, finding tons of DIY hair pieces here. However none of them were quite what I was looking for. I ended up on a blog with instructions on how to make a fabric flower. This gave me inspiration to improvise and make my own style of hair piece.

I decided to take the flower I found on this blog and add a hair piece capable to being added to almost any hairstyle. I'm not sure how everyone in my wedding will be wearing their hair yet but I think these hair pieces could help lend to my theme, since our wedding will likely be taking place outdoors. 

Supplies

  1. Various colours and types of fabrics (ensure fabrics have a high polyester content for this specific flower tutorial)
  2. A candle
  3. A lighter 
  4. Scissors
  5. Beads (the ones I used were fake pearl ones, I had laying around my house) 
  6. Thread (all I had was black, but you'll likely want to use colours similar to your fabric)
  7. Sewing needles
  8. A hair piece (not pictured)
Directions

  1. I began by cutting my fabrics onto various shapes. The tutorial I used showed using circles, but I wanted to experiment with creating different sizes and shapes of flowers so I made varying shapes in different colours, ensuring to keep all separated. I made about 10.
  2. I then lit the candle (this step can be done with a lighter also, but I felt it was easier as the candle would just stay lit when I was dealing with other things), in order to *carefully* begin singeing the edges of the fabric. This will create a curling on the fabric and create the appearance of petals.   This is the most time consuming part and requires close attention to make sure no fabric catches fire.
  3. I then layered each piece of fabric, ensuring each piece was placed correctly. This is the step where you create the shape of the flower you desire. It can take some time to create the look you want.
  4. I then sewed the fabric pieces together and added the pearl beads as I went. You can add as many or as few beads as you'd like. For most I chose to use fewer, but I did like the look of a multiple bead centre. This completes the flower portion of the project.
  5. I then found a hair comb barrette (there are many different styes available) and sewed the flower onto it. This proved to be much easier than I had originally imagined. I was able to wrap the thread around the thick piece of the barrette and it stayed very secure.

I absolutely LOVE the finished product. I will probably need to change the colours for the actual day but I would love to include these in my wedding. I plan on creating a more elegant bridal style for myself in coming months. I had so much fun with this project I plan on using it again in my wedding so stay tuned for a future post on this topic.

For those not in wedding planning mode, but interested in crafting for everyday life check out this fellow craft blog, DIY That I Try.

Friday 15 February 2013

Cheers


For a lot of people the thought of planning a wedding makes them want to start drinking, or so I’ve been told. This is the inspiration behind my post this week. While browsing Pinterest for ideas, I came across a post for a wedding signature cocktail, and it peaked my interest. I had never thought of alcohol as a means of personalizing my wedding.

Now, John and I are both not big drinkers, and the alcoholic drinks we do enjoy are very different. I am strictly a vodka kind of girl (even though I am experimenting with wine currently) and John is a Crown Royale kind of guy. So finding a signature drink that will express both of our personalities might be tricky.

As inspiration for this post I chose to make a variation on a peachy white wine sangria recipe I found online. If you’re interested in reading about some other alcohol inspired exspiritments, check out this blog.

Supplies:
  1. White wine
  2. Ginger Ale
  3. Peach Schnapps
  4. Glass
  5. Sugar
  6. Lemon


Directions:
  1. This step can also be done with water, but I took some lemon and rimmed the glass. I then used some festive sugar, which I had laying around my house, to create a rim on the glass.
  2. I then added 1oz of Peach Schnapps and equal parts Ginger Ale and White Wine to fill the glass (this amount with vary depending on size of glass)
  3. I also decided to add a ribbon to the glass as decoration. If this drink were to be used at my wedding, I think the ribbon just adds something extra to the experience.

While I enjoyed this drink quite a bit, I don’t think John will. Meaning I think we will need to eventually think up another idea for our signature drink. But if wedding planning ends up being as stressful as I’m told, testing out a few signature drink options might not be so bad.

Friday 8 February 2013

What's in a name?

Weddings mark a time of many changes. While not as common as in the past, it is tradition for the bride to take the last name of the groom. I plan on following this tradition, and will eventually take John's last name. Using this tradition as inspiration, I set out to create a DIY sign. I came across a unique idea on Pinterest that used nails and yarn to create a heart shape (for bookmarks on this specific project, click here).

I decided to try the same project, only instead of using one shape I decided to attempt using the five letters in my future last name.

Supplies:
  1. A piece of wood (I used a wooden shelf I found this at Value Village for $2.99)
  2. Blue and black acrylic paint (I had this laying around my house)
  3. A screw driver
  4. A hammer
  5. Nails (size can very depending on the thickness of the wood)
  6. Paint brush
  7. Sand paper
  8. Paper letter stencils
  9. Container for paint

Directions:
  1. Begin by removing any imperfections on your piece of wood. As I was using a former shelf, I removed the hooks. This wasn’t really required, but I felt it would look better in the end.
  2. Depending on the type of paint you are using, sand down the piece of wood prior to beginning. This step will depend on the type of wood you use.
  3. Paint the entire piece of wood and let dry. I wanted a deep blue colour, which I achieved by mixing black and blue paint.
  4. Arrange letter stencils on the piece of wood and tape down. Make sure each letter is secure, as you don’t want them moving during the next step.
  5. Carefully begin hammering a trail of nails along the outline of each letter. This is the most time consuming and tedious part of the project, as each nail needs to be evenly spaced apart.
  6. Remove the letter stencils, revealing an outline of nails in the shape of the name.
  7. Begin stringing yarn between the nails on each letter. I did not follow any specific pattern, but only attempted to have each letter filled completely before finishing. I also chose to include an outline upon finishing each letter but I feel this is optional.
  8. Cut loose any stray strands of yarn, being careful not to cut any yarn being used in the project. If one strand gets cut accidentally, the entire letter will unravel.

I’m very happy with how this project turned out. It ended up taking me a total of 4 hours to complete including painting and allowing it to dry, but thankfully I was able to do most of it while watching TV. I imagine using this sign somewhere on the gift table. I might add something to it before the wedding, but for now its perfect the way it is. 

Friday 1 February 2013

That time of year

As many of you may know, there are hundreds of different do-it-yourself projects for weddings. I've seen DIY save the dates, decorations, favours and even jewellery. With so much to see, I had a hard time deciding where to begin my DIY journey into the exciting world of weddings. I contemplated several different projects, but I've decided to start at the beginning...

I've been using Pinterest for a couple of years now. I find with so much creativity thriving in one place, it's an excellent resource for finding inspiration. During the month of December, while trying to find said inspiration for my Christmas gifts, I came across a bookmark for the blog From Glitter to Gumdrops. Here I found a project for a DIY Christmas tree ornament filled with clippings of the couples wedding invitation. I liked how the project would always act as a reminder of their big day.

You might be wondering why I am rambling on about a Christmas ornament. Well, we were one of those lucky couples to become engaged over the holiday season. So instead of using a wedding invitation I decided to take elements of my proposal and incorporate them into a christmas ornament of my own.

Supplies:
  1. Dried flower petals  - These are from the roses I was given during my proposal
  2. Photo Ball Ornament - I got this from Wal-Mart (after Christmas, on clearance, price $1.99)
  3. Strips of paper with the date - For when I forget (haha... just kidding!)
  4. Chocolate chips - Element of the proposal (for the whole proposal story, check our the Our Story)
Directions:
  1. Take the strips of paper and run them along a blade on a pair of scissors. Be careful not to cut yourself! This will curl the paper so they will fit in the ornament.
  2. Open the ornament completely to make this project easier. This may seem self explanatory, but many of the ornaments I saw were broken from people not knowing how they opened. Use caution.
  3. Insert one curled piece of paper in each half of the ornament. This will ensure that it can be seen from both sides when closed.
  4. Fill remaining space with dried flower petals and chocolate chips. I only used a few chocolate chips because I am not sure if they will hold up over time, we'll see, I suppose.
  5. Carefully close the ornament and secure any safety locks. Thankfully the ornament I found locks by twisting the top, so I don't have to worry about it spilling open down the road.

Overall, I'm happy with the finished product. It's something we'll be able to look at year after year and will serve as a reminder of the Christmas we promised one another forever. I'm aware this post isn't exactly "wedding day" related, but you can't have a wedding without a proposal so I felt it was a good way to start.

Monday 21 January 2013

The Journey Begins


Having been to very few weddings in my time, I've mostly had to listen to other people talk about how much planning is involved. Sure, I've imagined what my wedding would look like, but it's always appeared as more of a "big picture" instead of the specific details. I realized this was a problem after the proposal, when people started asking me if we had thought of a date for our wedding. 

Not knowing where to start when beginning my bridal journey, I decided to check out the 2013 Niagara Spring Bridal Wedding Show with my roommate/best friend for inspiration. Vendors from all over the Niagara Region were able to showcase their companies/talents for newly engaged couples. They had an assortment of different venue options, florists, bridal salon representatives, disk jockey services, photographers – you name it, they had it!  I was even surprised with a fashion show towards the end of the day.

After attending this show I am starting to understand just how much work is ahead of us. It’s also easy to see how easy it is for a wedding to add up cost wise. With so many details to consider, it will be important establish a budget and stick to it.


Having just gotten engaged, we are not quite at the point of making any definite plans on location or venue. So while I plan to document my wedding planning process eventually, I will be starting with ideas for stationery, favors and signage, DIY decorations, and will be exploring other cost saving options for achieving that dream wedding without having to spend a fortune to get it. 


*Trying out a photo booth at the show*